· Rajasekhar Gundala · Database · 8 min read
How to deploy MariaDB 11.0.2 in docker swarm cluster behind Traefik v2.0
MariaDB turns data into structured information in a wide array of applications, ranging from banking to websites. It is an enhanced, drop-in replacement for MySQL.

In this post, I am going to show you how to deploy MariaDB in Docker Swarm Cluster using Docker Compose to act as a database server for all applications we will be deploying later as I mentioned earlier in the Traefik article.
MariaDB turns data into structured information in a wide array of applications, ranging from banking to websites. It is an enhanced, drop-in replacement for MySQL.
MariaDB is used because it is fast, scalable and robust, with a rich ecosystem of storage engines, plugins and many other tools make it very versatile for a wide variety of use cases.
Prerequisite
Please make sure you should fulfill the below requirements before proceeding to the actual deployment.
Docker Swarm Cluster with GlusterFS as persistent tool.
Traefik as reverse proxy to expose micro-services to external.
Introduction to MariaDB
MariaDB is one of the most popular database servers in the world. It’s a fork of MySQL, made by the original developers of MySQL.
MariaDB is guaranteed to stay open source. Notable users include Wikipedia, WordPress.com and Google.
MariaDB is developed as open-source software and as a relational database, it provides an SQL interface for accessing data.
The latest versions of MariaDB also include GIS and JSON features.
You can find more about MariaDB here.
Docker Container Data
By default all data written to the file system inside a container is ephemeral. We will lose the data when the container is terminated. Web servers, application servers, proxies and a host of other applications do not store data directly themselves, relying instead on a database server for secure, reliable information storage.
Check this article to know about managing data in Docker Containers.
I am going to use GlusterFS to overcome the ephemeral behavior of Containers.
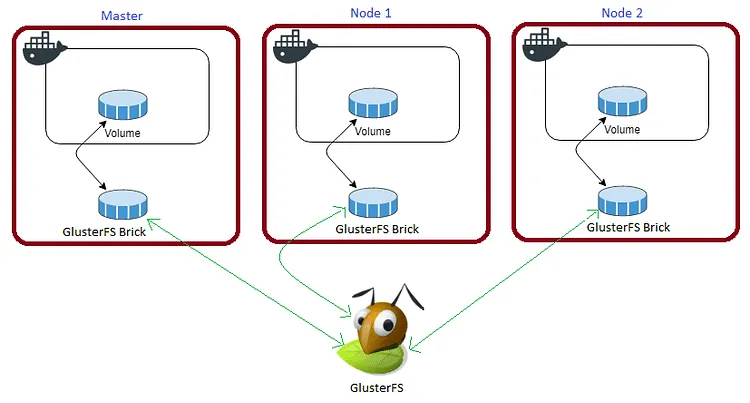
I already set up a Replicated GlusterFS Volume to have data replicated throughout the cluster if I would like to have some persistent data.
The below diagram explains how the replicated volume works.
Volume will be mounted on all the nodes, and when a file is written to the
/mntpartition, data will be replicated to all the nodes in the Cluster

In case of any one of the nodes fails, the application automatically starts on other node without loosing any data and that’s the beauty of the replicated volume.
Persistent application state or data needs to survive application restarts and outages. We are storing the data or state in GlusterFS and had periodic backups performed on it.
We will use a backup of the volume to spin a new application container anywhere else in case of unexpected issues occur in the current environment.
I am going to persistent /var/lib/mysql of Maria DB for disorder recovery.
Create folders in /mnt directory to persistent Metabase data folder.
cd /mntsudo mkdir -p mariadataPlease watch the below video for Glusterfs Installation
https://www.youtube.com/embed/VU-cxFObPjI?feature=oembed
Secure MariaDB Environment
MariaDB Docker images have typically offered various ways to set the MySQL root password, where some methods are recommended over others.
Ways to set passwords…
Specify
MYSQL_ROOT_PASSWORDandMYSQL_PASSWORDin environment variable section in compose file.Mounting a password file into the container and have
MYSQL_ROOT_PASSWORD,MYSQL_PASSWORD,MYSQL_ROOT_HOST,MYSQL_DATABASEandMYSQL_USERin it.Specify
MYSQL_RANDOM_ROOT_PASSWORDin environment variable section to have MariaDB generate a random root password. The generated root password will be printed to stdout (GENERATED ROOT PASSWORD: .....). Recommended methodDocker Secrets – Secrets are securely stored in an encrypted Raft log and replicated to other nodes in the cluster. Recommended method
We use Docker Secrets method for passing required password values to MariaDB Container.
Specifying MYSQL_ROOT_PASSWORD in environment variable is the least secure option. The environment variables are exposed to both the host system and to the container itself, leaving the password at very high risk of exposure.
Mounting a password file will avoid some of the exposure, but the file would still have to be stored on the host system. Not really ideal.
Docker introduced a new mechanism for managing sensitive data with Docker Secrets in version 1.13. Click here to get an overview of it.
Setting up containers with secrets in Docker Compose is straightforward. We’ll specify our secrets in the environment variable section, and tell MariaDB to use those secrets after the container starts.
MariaDB Custom Configuration File
The startup configuration is specified in the file /etc/mysql/my.cnf, and that file in turn includes any files found in the /etc/mysql/conf.d directory that end with .cnf. Settings in files in this directory will augment and/or override settings in /etc/mysql/my.cnf. If you want to use a customized MySQL configuration, you can create your alternative configuration file in a directory on the host machine and then mount that directory location as /etc/mysql/conf.d inside the mariadb container.
If
/my/custom/config-file.cnfis the path and name of your custom configuration file, you can start yourmariadbcontainer with the directory path of the custom config file.
You have to mount only the directory path of the custom config file like the command below:
version: "3.7"

services:
  mariadb:
    image: mariadb:latest
    volumes:
      - /my/custom:/etc/mysql/conf.d
This will start a new container
mariadbwhere the MariaDB instance uses the combined startup settings from/etc/mysql/my.cnfand/etc/mysql/conf.d/config-file.cnfwith settings from the latter taking precedence.
MariaDB without Configuration File
Many configuration options can be passed as flags to mysqld. This will give you the flexibility to customize the container without needing a cnf file.
For example, if you want to change the default encoding and collation for all tables to use UTF-8 (
utf8mb4). Alsowait_timeout,interactive_timeoutandmax_allowed_packetsettings for the container. Just include the values incommandkey as described in below code:
version: "3.7"

services:
  mariadb:
    image: mariadb:latest
    command: "mariadb", "--character-set-server=utf8mb4", "--collation-server=utf8mb4_unicode_ci", "--wait_timeout=28800", "--interactive_timeout=28800", "--max_allowed_packet=256M"]
Please check mariadb docker hub for more configuration options.
Prepare MariaDB Environment
Let’s start creating passwords for MariaDB Container using the Docker Secrets method.
Create wp_db_password.txt and mysql_root_password.txt text files with your secrets in the directory.
sudo nano wp_db_password.txtsudo nano mysql_root_password.txtCreate a docker overlay network private, we will use it to bind MariaDB with Application Containers with out exposing it to outside world.
docker network create -d overlay privateCreate folder in /mnt directory to persistent MariaDB data folder, /var/lib/mysql
cd /mntsudo mkdir -p mariadataMariaDB Docker Compose
Now it’s time to create a folder, maria in /opt directory to place docker compose the configuration file, i.e, .yml file for MariaDB.
Use the below commands to create the folder, maria.
cd /optsudo mkdir -p mariacd mariasudo touch maria.ymlOpen maria.yml with nano editor using sudo nano maria.yml
Copy and paste the below code in the maria.yml configuration file.
Here is the docker compose file for MariaDB.
version: "3.7"

services:
  mariadb:
    image: mariadb:latest
    volumes:
      - /mnt/mariadata:/var/lib/mysql
    secrets:
      - wp_db_password
      - mysql_root_password
    environment:
      - MYSQL_USER=testuser
      - MYSQL_DATABASE=testdb
      - MYSQL_PASSWORD_FILE=/run/secrets/wp_db_password
      - MYSQL_ROOT_PASSWORD_FILE=/run/secrets/mysql_root_password
    networks:
      - proxy
    deploy:
      placement:
        constraints: [node.role == manager]
      replicas: 1
      update_config:
        parallelism: 2
        delay: 10s
      restart_policy:
        condition: on-failure
      labels:
        - "traefik.enable=false"
secrets:
  wp_db_password:
    file: ./wp_db_password.txt
  mysql_root_password:
    file: ./mysql_root_password.txt
volumes:
  mariadata:
    driver: "local"
networks:
  private:
    external: false
I use the Traefik stack that was deployed (proxy stack) earlier to Docker Swarm Cluster as a reverse proxy/load balancer.
Lets discuss about some of the configurations under
deploykey.
deploy key
It allows us to specify configurations related to the deployment and running of services. The deploy key can also be used to constrain some services to run only on the manager node.
This only takes effect when deploying to a swarm cluster with `docker stack deploy` command and is ignored by docker-compose up and docker-compose run commands.
deploy:
  mode: replicated
  replicas: 1
  update_config:
    parallelism: 2
    delay: 10s
  restart_policy:
    condition: on-failure
Several sub-options are available for deploy key.
mode is specified either as global (exactly one container per swarm node) or replicated (a specified number of containers). Default is replicated.
mode: global
replicas is to specify the number of containers that should be running at any given time.
replicas: 1
placement is to specify the placement constraints for the stack or service to run.
placement:
  constraints:
    - node.role == manager
update_config is to configure how the service should be updated. Useful for configuring rolling updates.
parallelism: The number of containers to update at a time.delay: The time to wait between updating a group of containers.failure_action: What to do if an update fails. EithercontinueorpauseDefault ispause.
update_config:
  parallelism: 2
  delay: 10s
resources is to configure resource constraints. This replaces the older resource constraint options in Compose files prior to version 3 (cpu_shares, cpu_quota, cpuset, mem_limit, memswap_limit).
resources:
  limits:
    cpus: '1.5'
    memory: 500M
  reservations:
    cpus: '1.0'
    memory: 200M
restart_policy is to configure whether and how to restart containers when they exit.
condition: One ofnone,on-failureorany. Default is any.delay: How long to wait between restart attempts. Default is 0.max_attempts: How many times to attempt to restart a container before giving up. Default is never give up.window: How long to wait before deciding if a restart has succeeded. Default is decide immediately.
restart_policy:
  condition: on-failure
  delay: 5s
  max_attempts: 3
  window: 120s
labels is to specify labels for the service. These labels will be set only on the service, and not on any containers for the service.
version: "3.7"
services:
  mariadb:
    image: mariadb:latest
    deploy:
      labels:
        - "traefik.enable=false"
To set labels on containers instead, use the labels key outside of deploy:
version: "3.7"

services:
  mariadb:
    image: mariadb:latest
    labels:
       - "traefik.enable=false" - "MariaDB stack is not available to outside by specifying false here"
Deploy MariaDB using Docker Compose
Now it’s time to deploy our docker compose file above, maria.yml using the below command
docker stack deploy --compose-file maria.yml mariaYou can give it any name for the stack. I just named it as
maria
We can check the status of the stack by using docker stack ps maria
Create Databases
Login to MariaDB Container.
Type docker ps on master node to get the running containers on it. The out should look like below.

Note down CONTAINER ID of MariaDB from the above command.
Type docker exec -it CONTAINER ID bash to log into MariaDB Container.
After logging into the container, type mysql -u root -p to go to the MariaDB admin console.
Enter root password here, whatever you created using the Docker Secrets method in Prepare Environment section of this article.
Just type SHOW DATABASES to see all the databases in our MariaDB Container.
By default the container should create one database that was specified in the configuration file,
testdbhere.
We can create databases using CREATE DATABASE test;
We will be using the databases for applications we are going to deploy soon.
Delete database using DROP database;
Please watch the below video for MariaDB Installation in Docker Swarm
https://www.youtube.com/embed/NUcDn3MxJ1c
If you are not familiar with the managing database servers, MariaDB using the console, I will post an article to deploy Adminer – Database Management Application which has excellent GUI to manage, is written in a single PHP file, and has a lot of advantages over phpMyAdmin tool.
Stay tuned for Adminer 🙂